Arduino Crystal Oscillator Tutorial
Arduino Uno Crystal Oscillator Configurations Arduino boards use a variety of oscillator configurations. Also you can use it with a crystal oscillator.

The 20mhz Arduino Uno And Bootloader Tutorial Youtube
The answer is by using the crystal oscillator.
Arduino crystal oscillator tutorial. XTAL2 Chip Clock Oscillator pin 2 Used as clock pin for Crystal Oscillator or Low-frequency Crystal Oscillator. Does anyone know what is the tolerance of the crystal oscillator used in Arduino mega 2560. So it helps Arduino in dealing with time issues like calculate time.
Start Today and Become an Expert in Days. If you are an Arduino developer you might have banged a 16MHz crystal across pins 9 and 10 of the Atmega 328 with two 22pF caps on each end and never given it another thought. When used as a clock pin the pin can not be used as an IO pin.
Ad Learn Arduino Online At Your Own Pace. 0 This article will show you how to add an external crystal oscillator and power supply to your Atmega328 microcontroller that has Arduino bootloader that way letting to use the microcontroller without Arduino board. Arduino Pin Alternate Functions.
Crystal Oscillator The crystal oscillator helps Arduino in dealing with time issues. It uses the SI5351 oscillator from Silicon Labs controlled by Arduino. This is a 16 MHz Crystal Oscillator.
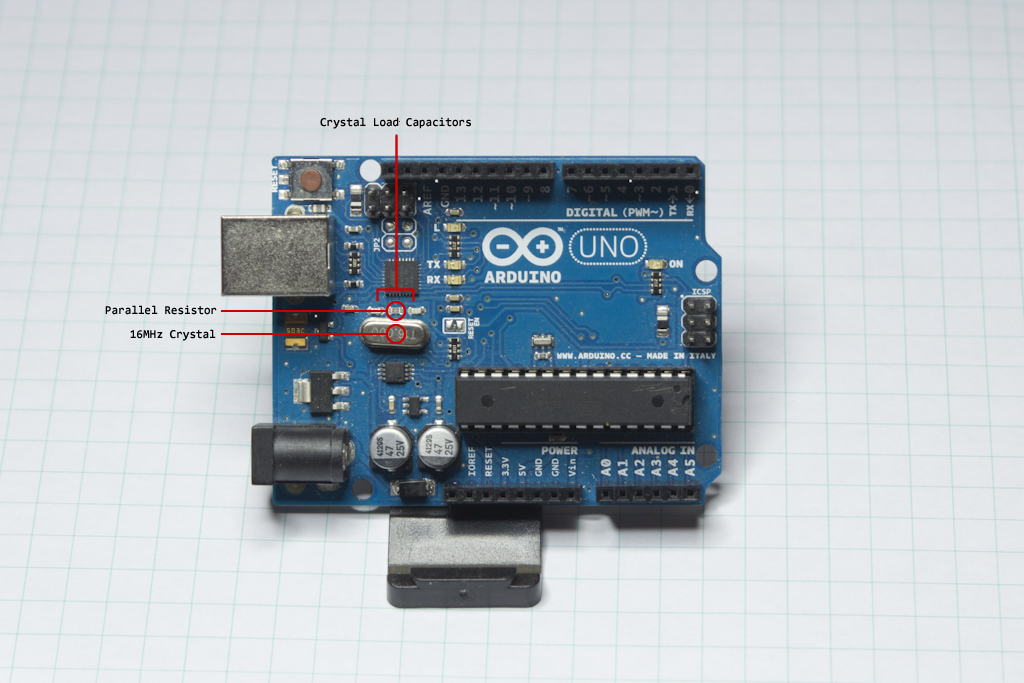
More info on oscillators will be discussed in the upcoming tutorials. The number printed on top of the Arduino crystal is 16000H9H. It tells us that the frequency is 16000000 Hertz or 16 MHz.
The software developed for this project can be freely distributed using the MIT Free Software model. Crystal Oscillator The crystal oscillator helps Arduino in dealing with time issues. How Crystal Oscillators Work.
Retrolefty January 28 2013 418am 2. It tells us that the frequency of the Crystal Oscillator is 16000000 Hertz or 16 MHz. An Arduino consists of many components like.
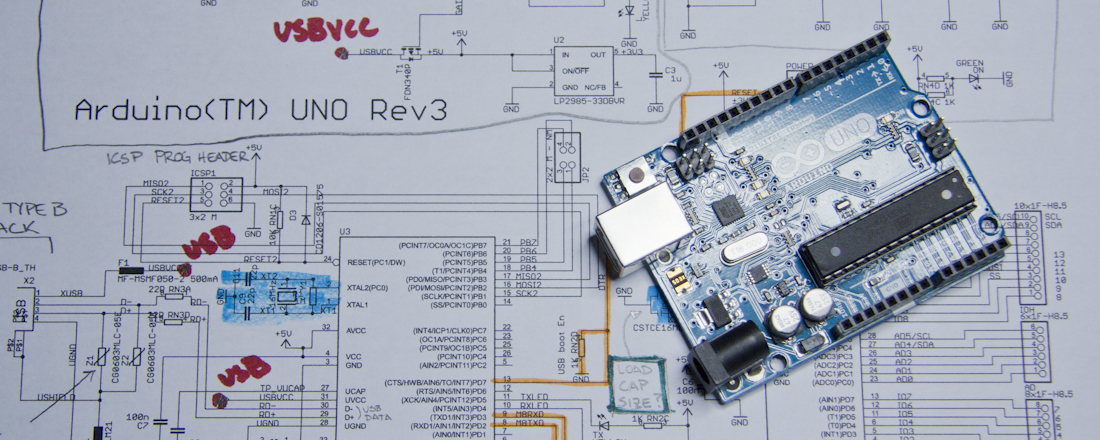
The Uno board features a very pronounced crystal oscillator next to the USB-B port. A DIY Arduino board is presented here with most of the capabilities of the classic Arduino Uno board but with a slimmer profile and more flexibility in hardware. In contrast you can also use the PIN with the name RESET to attach an external reset button.
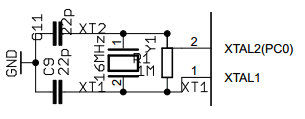
Parallel Resistor The parallel resistor on the official schematic came out of nowhere and I cant find any reason for it being there. Crystals parallel resonant frequency fp is Now we can understand that the series resonant frequency is 920 MHz and the parallel resonant frequency is 923 MHz The Q factor of this crystal will be- Colpitts Crystal Oscillator. As shown in the image above the T16000 marking indicates that the device oscillates at 16 MHz.
The two capacitors and the crystal above will provide the external oscillator source for the ATMEGA16U2 on our Arduino From Scratch. In this case you will not need the SI5351 devive and Arduino. The 33 volts version of the Arduino pro mini board has an 8MHz onboard oscillator whereas the 5-volt version has a 16MHz oscillator.
Adding external oscillator to Atmega with Arduino bootloader August 18 2017 Small fun projects Comments. It shows the following part being a resonator and not a crystal There are ceramic resonators and there are crystal resonators both can be called resonators. Start Today and Become an Expert in Days.
Most of the external components used with Arduino will work between 33V and. Join Millions of Learners From Around The World Already Learning On Udemy. You can assume this one is an.
How does Arduino calculate time. This project is about a shortwave trasmitter from 3 MHz to 30 MHz. And in fact a ceramic resonator.
How does Arduino calculate time. In this video the working and design of the crystal oscillator have been explainedBy watching this video you will learn the following topics021 why cry. It tells us that the frequency is 16000000 Hertz or 16 MHz.
The number printed on top of the Arduino crystal is 16000H9H. The Arduino board uses this to calculate time. The answer is by using the crystal oscillator.
The advantage to using the DIY Arduino board is its ability to change the input voltage 27V - 55V the crystal oscillator 0-16MHz and the use of LEDs and regulators when needed. So in this tutorial we will look inside the can and see how it actually works. You can hard reset your Arduino by pushing the button.
But a minimal circuit can have just the brain of the Arduino UNO that is an ATmega328p microcontroller Reducing Arduino Power Consumption. Join Millions of Learners From Around The World Already Learning On Udemy. TOSC2 Timer Oscillator pin 2.
Majority of the Arduino Pro Mini boards uses ceramic oscillator however I have also seen Arduino Pro mini boards with a crystal oscillator. Ad Learn Arduino Online At Your Own Pace. A linear regulator USB to Serial microcontroller debug LED power LED reset button RX TX LED crystal oscillator etc.
Arduino From Scratch Part 9 16mhz Crystal Oscillator
Arduino From Scratch Part 9 16mhz Crystal Oscillator
Arduino From Scratch Part 9 16mhz Crystal Oscillator
![]()
Arduino Oscillators Clock Speed Atmega328p Oscillator Arrow Com