Arduino Capacitor Tutorial
Each capacitor should be accompanied by a name -- C1 C2 etc. The Arduino discharges the capacitor circuit by setting pin 7 low.

Arduino Serial Plotter Capacitors Arduino Project Hub
Here is an Illustrated Article on Which Capacitor to Use When in Arduino Circuits.
Arduino capacitor tutorial. Introduction The nRF24L01 24GHz transceiver modules are cheap and very effective but I have come across a few Threads in which people were having trouble with them so I thought it might be useful to gather together in one place a basic step-by-step sequence for getting them to work. I recently attached a servo to my Arduino for the first time. They are needed as part of a circuit designed to accomplish some task.
CAP-ESR-FREQ meter with an Arduino Duemilanove. Capacitive Touch Sensor - 699 5 pcs Amazon. Not just touch but also how to detect the force exerted and the distance from the finger as well.
Create capacitive sensors that can detect touch or proximity. Start Today and Become an Expert in Days. Ad Learn Arduino Online At Your Own Pace.
Join Millions of Learners From Around The World Already Learning On Udemy. A Capacitive sensor is a kind of touch sensor that requires little or no force to activateIn this Instructable about capacitive. Although Im glad I got this working this leaves me with several concerns.
This tutorial provides a guide on how to set up an Arduino to measure the capacitance of a capacitor. Capacitor values in nanofarads and microfarads the equivalent serie resistance ESR value of a capacitor and last but not least. The video shows a pnp transistor being used with a 1k resistor running between the base and the wiring to pin 9 on the arduino.
I am on tutorial 5 and am working towards powering a simple dc motor. In the capacitance meter a zero calibration is performed every time it is turned on therefore at the moment of switching on a capacitor should not be connected to the measuring contacts. This will allow us to create a switch without any moving parts and requires only an Arduino board and one of the capacitive touch sensors shown below.
The symbol with the curved line 2 in the photo above indicates that the capacitor is polarized meaning its probably an electrolytic capacitorMore on that in the types of capacitors section of this tutorial. It makes sure the capacitor is empty by reading the voltage over it. This can be measured using a soil moisture sensor either resistive or capacitiveHere we will use Capacitive Soil Moisture Sensor v12This sensor measures the volumetric content of water inside the soil and.
All the sensor setup requires is a medium to high value resistor and a piece of wire and a small to large piece of aluminum foil on. This project is about Arduino and Capacitive Soil Moisture Sensor LCDOLED Interfacing Tutorial. EDIT 03 Feb 2021 - For this Tutorial install Version 117 of the RF24 library available with the Arduino.
This instructable is a tutorial that will guide you on using the Capacitive touch sensors with Arduino. Components like capacitors and resistors are passive components and have practically zero usage by themselves. The capacitiveSensor library turns two or more Arduino pins into a capacitive sensor which can sense the electrical capacitance of the human body.
In this tutorial I will show how to use an Arduino for touch and capacitive sensing. I ended up needing a 470uF capacitor wired like this tutorial shows because my servo was freaking out and causing my laptop to throw power surge warnings I have my Arduino connected to my laptop via USB. Join Millions of Learners From Around The World Already Learning On Udemy.
Soil moisture is basically the amountcontent of water present in the soil. The capacitor under test is charged using one of the resistors. With all the different ways capacitors are labeled figuring out the values of your capacitors can be challenging.
This can be useful if the capacitor. Ad Learn Arduino Online At Your Own Pace. In this tutorial you can find all neccessary information about a metering instrument based on an Arduino Duemilanove.
It starts charging the capacitor circuit and starts the timer. After finishing this project youll be able to measure all of your capacitors and label. The following parts are used in this tutorial.
My question is how do capacitors differ in applications such as this. Measure Capacitance With Arduino. Especially if you dont have a digital multi-meter to test them.
In this tutorial Ill show you how to build three different capacitance meters using an Arduino and a couple resistors. The Arduino initiates the charging of the capacitor through resistor according to its capacity. Start Today and Become an Expert in Days.
Which Capacitor to Use When in Arduino Circuits. With this instrument you can measure three things. -- and a value.
In our case we will focus on the capacitive reaction due to the human touch. I will briefly explain the theory and then build a touch sensitive circuit with a simple wire resistor LED and. It continues charging until the capacitor until it reaches 316 volt 632 of 5 V.
On the collector a 1uf capacitor is used as well as a diode. Arduino Uno - 1086.
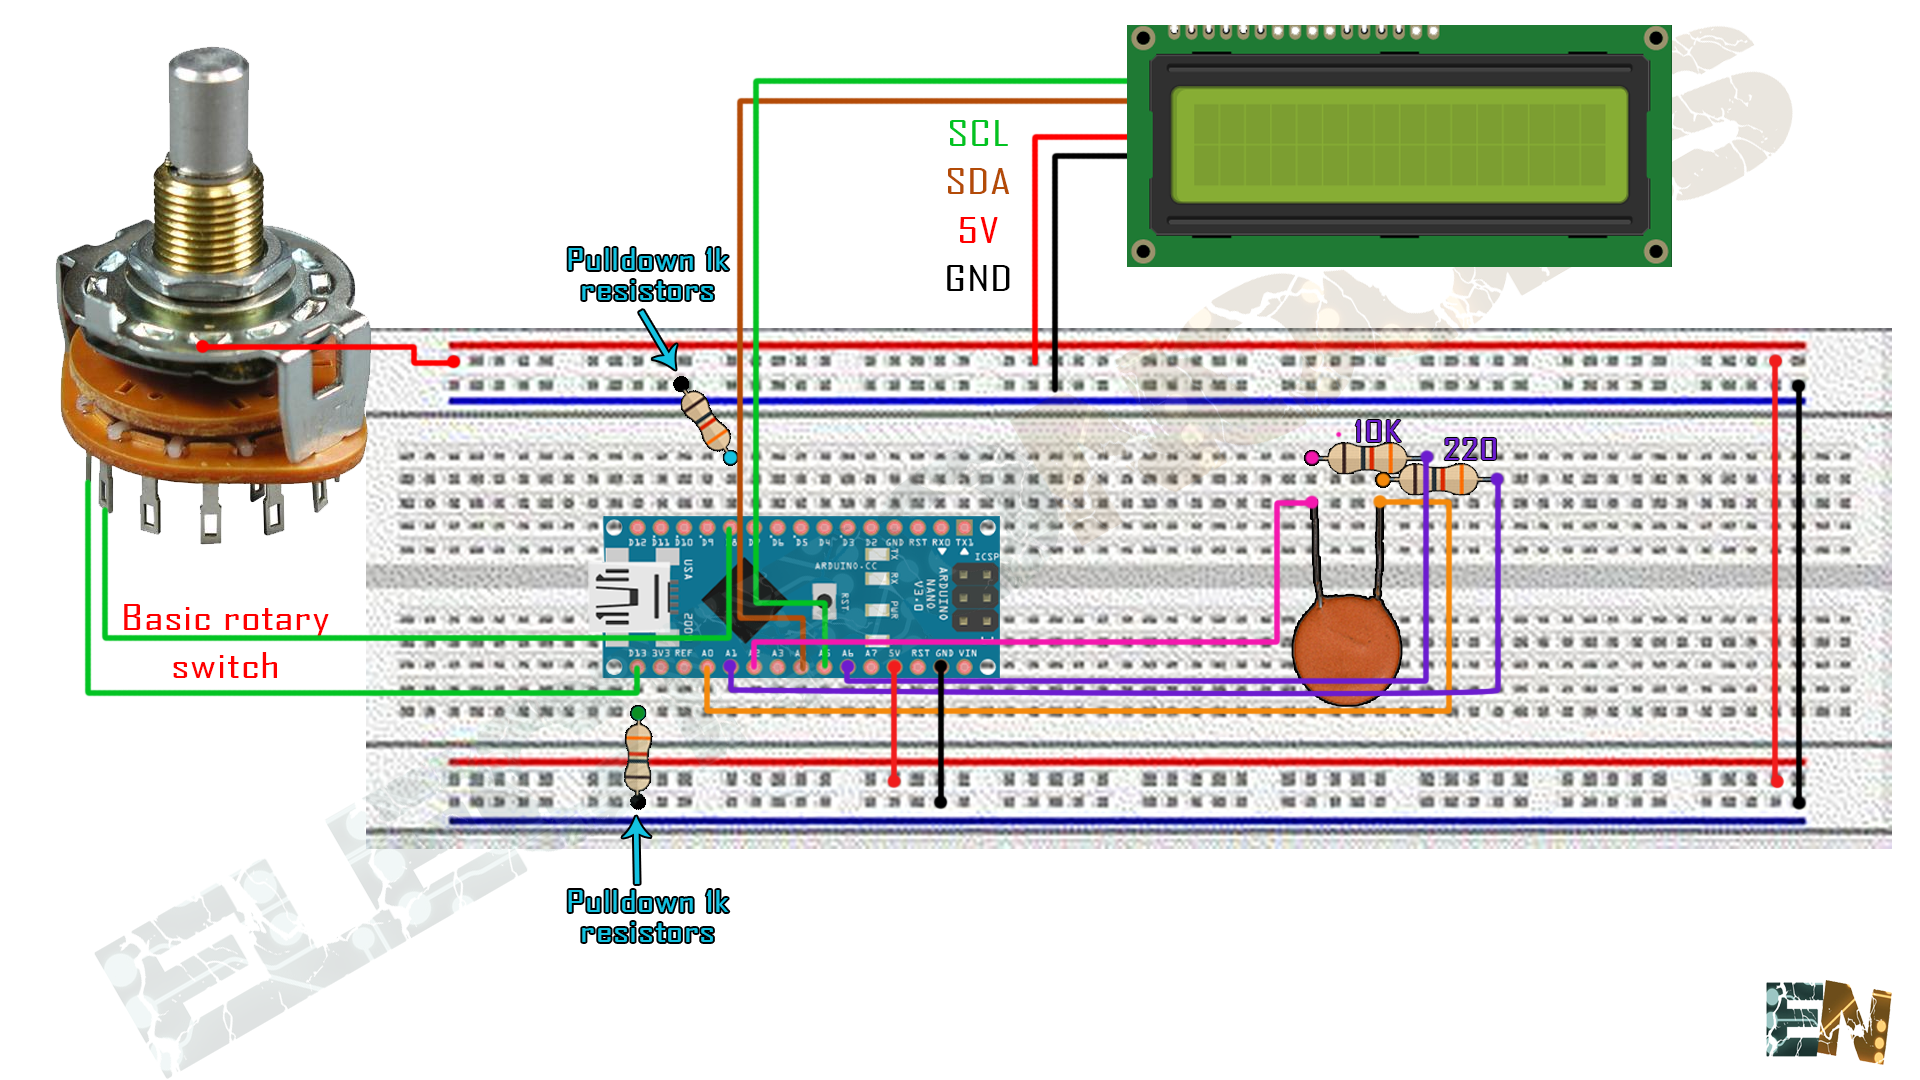
How To Make A Capacitance Meter Using Arduino
Arduino Capacitance Meter Arduino Learning
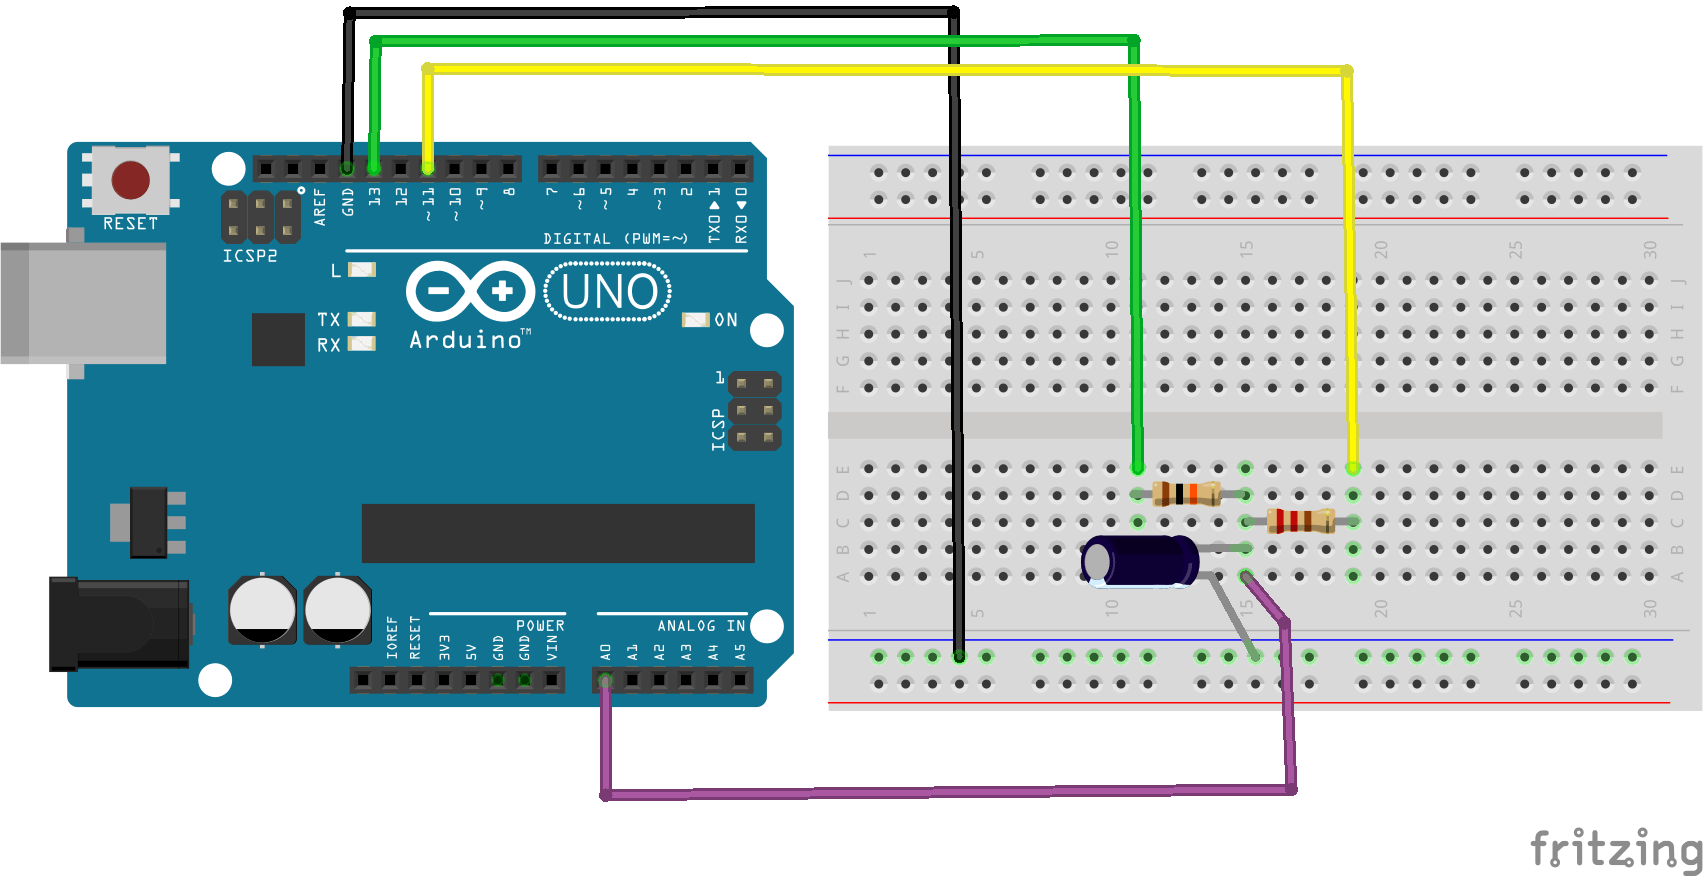
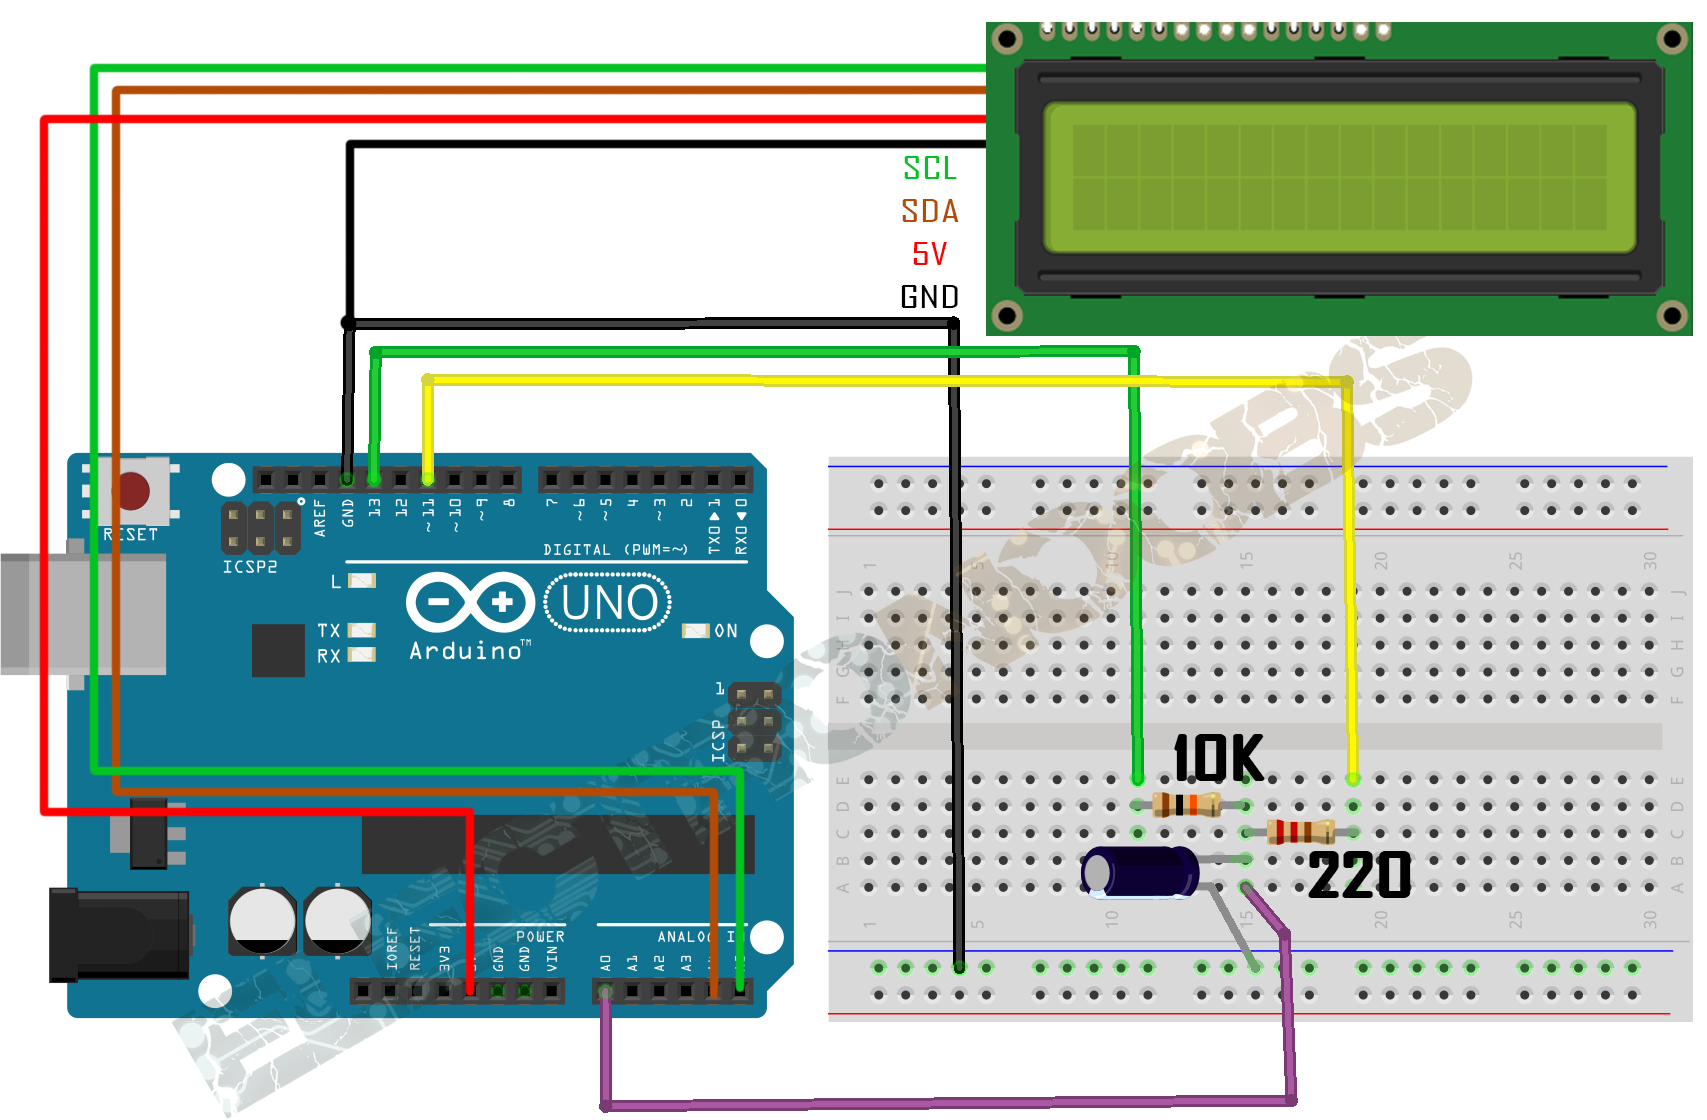
How To Make A Capacitance Meter Using Arduino

Measure Capacitance With Arduino 6 Steps With Pictures Instructables